hydraulic filter leaking

mfruhbeis

New member
May 28, 2018
6
0
0
Hampstead nh 03841
I have BX1800 and I started to use it this morning and noticed hydraulic fluid coming from the bottom of the machine. It looks like it is coming from the filter and when I removed it the seal was coming off. I installed a new filter and when i start the machine fluid still pours out. Its like the seal is not sealing. I have tighten it as much as i can, but I feel like there is a little movement in the filter. what can i do to ensure that the seal holds?

Thanks
 

85Hokie

Moderator
Staff member
Lifetime Member

Equipment
BX-25D ,PTB. Under Armor, '90&'92-B7100HST's, '06 BX1850 FEL
Jul 13, 2013
10,660
2,427
113
Bedford - VA
Second what Cat said..... double gasket=leak
 

100 td

Active member

Equipment
B21TLB (B21, TL421 & BT751) Toyota SDK4 T116 Bobcat
Aug 29, 2015
1,776
8
38
ɹǝpunuʍop
I'm not up on the location of the filter on your machine, but if not a double gasket leak, is it possible the filter or housing has sustained a knock from something like sticks or rough terrain?
 

mfruhbeis

New member
May 28, 2018
6
0
0
Hampstead nh 03841
It looks pretty clean, no double gasket in there. The thread looks a little rough, but the filter goes on nice and smooth.

Could it have been hit but something, maybe, it sits underneath and a stick or rock could have hit it but the filter was not damaged.

The threaded nipple that comes out of the case on the tractor, is that something that can be replaced or am i looking at a new housing?
 

85Hokie

Moderator
Staff member
Lifetime Member

Equipment
BX-25D ,PTB. Under Armor, '90&'92-B7100HST's, '06 BX1850 FEL
Jul 13, 2013
10,660
2,427
113
Bedford - VA
It looks pretty clean, no double gasket in there. The thread looks a little rough, but the filter goes on nice and smooth.

Could it have been hit but something, maybe, it sits underneath and a stick or rock could have hit it but the filter was not damaged.

The threaded nipple that comes out of the case on the tractor, is that something that can be replaced or am i looking at a new housing?
Anyway to get a picture of it? IT is possible that you hit something and it did some damage. Two filters showing leaks would be an indication of something else is wrong.
 

dirtydeed

Well-known member
Lifetime Member

Equipment
B2650 BH77, U27-4R2, BX23TLBM, box blade, rear blade, flail mower, Stump Grinder
Dec 8, 2017
2,973
3,503
113
Wind Gap, PA
hmmm. that doesn't look good at all. I would suspect that you just aren't able to get the filter tight enough with those threads being boogered up. Not sure what the fix is for it...perhaps re-chasing the threads?
 

Stmar

Active member

Equipment
B2650HSDC
May 23, 2017
922
45
28
Buffalo, Wyoming
That does look like the problem, now what is the solution? Threads need cleaned up, recut and hopefully that will let the filter tighten up. Can you use a tap and die? Is that piece replaceable or is it a major component that requires shop time? Let us know how you solve the problem.
 

RWey56

Member

Equipment
BX23S
Feb 8, 2018
111
3
18
Stanchfield, MN
My 2c.

I agree that the bunged up threads are probably fooling you into thinking it's tight, when in truth it's not. If the nipple can't be easily replaced, I'd be inclined to find a die and re-cut/clean up the threads. You won't be able to use a normal die handle, but a pair of channel locks should do the trick. The tranny fluid should act as an adequate cutting oil. When done, I'd get a shop vac in there to make sure all metal shavings are removed.
 

Ramos

New member

Equipment
1870-1, LA203A, RCK54
Feb 25, 2016
463
3
0
Sherman County, Oregon
As best as I can tell from the pictures, it appears that the nipple is actually part of the casting and not a separate, removable piece. Clean up the threads with a die and hope for a happy outcome. Take a filter to the tool store, that will get you to the proper size and thread pitch for the die. Make darn sure you get the die started properly on the nipple. You are dealing with soft material that already has somewhat compromised threads.

If the die fails to clean up the threads close enough to face of the filter base, you may have to grind the flat (starting) side of the die. Basically creating a 'bottoming' die.
 

RWey56

Member

Equipment
BX23S
Feb 8, 2018
111
3
18
Stanchfield, MN
If the die fails to clean up the threads close enough to face of the filter base, you may have to grind the flat (starting) side of the die. Basically creating a 'bottoming' die.
Shouldn't have to do that. You can usually put the die on backwards if the threads are already cut. Just have to make darn sure you have the threads lined up. A split die will help.
 

Ramos

New member

Equipment
1870-1, LA203A, RCK54
Feb 25, 2016
463
3
0
Sherman County, Oregon
Shouldn't have to do that. You can usually put the die on backwards if the threads are already cut. Just have to make darn sure you have the threads lined up. A split die will help.

Right, you are. I had a little bit of 'tap' on the brain while typing about dies! However, if you do need to grind on the die, grind on the back side. As RWey said, most likely will not be needed. I apologize for adding confusion to the thread. :p
 

mfruhbeis

New member
May 28, 2018
6
0
0
Hampstead nh 03841
Ok, I have never use a die before but I will give it a shot. Is this something a weekend warrior with construction and automotive experience able to do or am I getting over my head. Also, besides bringing in the filter and testing, how would i know what size die to use?
Thanks
 

RWey56

Member

Equipment
BX23S
Feb 8, 2018
111
3
18
Stanchfield, MN
Right, you are. I had a little bit of 'tap' on the brain while typing about dies! However, if you do need to grind on the die, grind on the back side. As RWey said, most likely will not be needed. I apologize for adding confusion to the thread. :p
To be fair, you can't always get a die on backwards. What I have done to get it started is to find the right thickness washer and wedge it in the split of the die, thus opening it up enough to screw it one backwards. When you're sure your threads are lined up, pull the washer out then have at it.
 

RWey56

Member

Equipment
BX23S
Feb 8, 2018
111
3
18
Stanchfield, MN
Ok, I have never use a die before but I will give it a shot. Is this something a weekend warrior with construction and automotive experience able to do or am I getting over my head. Also, besides bringing in the filter and testing, how would i know what size die to use?
Thanks
Watching a couple of short vids on using a die would help I'd say. You have to walk them in 1/4 turn or so farther each time, then back them out a bit to clear the shavings. Make sure it has oil on it for cutting.

What you need to find is something like this with proper thread size. One like this will be easy to turn with a wrench or channel lock.


Bring in the filter to match the thread size. Screw the die on by hand the correct way first to clean up as much as you can, then put it on backwards to clean up the threads further down the nipple. Again, make sure to clean up any shavings. Hate to see them wind up in your tranny. Also, you're going to have to be careful torguing your filters as they're not going to have as many good threads anymore.
 
Last edited:

Ramos

New member

Equipment
1870-1, LA203A, RCK54
Feb 25, 2016
463
3
0
Sherman County, Oregon
A good tool store, or a hardware store with a decent tool department will match the die to your filter. Either by measuring with a caliper and thread-pitch gauge or trying actual bolts in the filter. Hopefully, they will measure and then confirm with a bolt or hydraulic fitting. You may also get this information by calling your dealer with the filter number. This should get you into the correct size die. Just to pull numbers out of thin air, something like 12-1.5. The first number represents metric diameter and the second one is thread pitch.

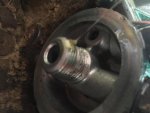
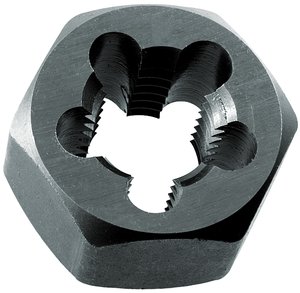
Once you have the correct die, note that it says something like 'Start From This Side' on only one side. That will go onto the nipple first. Think of the die as a nut that cuts. Screw the die on by hand to begin. By the look of your threads, it should start EASILY. If not, unscrew it and try again. Once properly started, screw it on until the boogered (technical term) threads result in resistance. Then, screw in a quarter turn further (cutting) then back off a half turn (breaking off cut material). Keep repeating this until the die bottoms out against the face of the filter head. Cut, clean, cut, clean= screw in, back off, screw in, back off. Once you have gone as far as you can, spin the die off of the nipple, flip it over and repeat.

You are cleaning, or chasing the threads. There should not be any great resistance. Use the least amount of leverage possible on the die to give you a better feel of what is going on. Any time it starts to feel tight, back up to clean, then proceed.

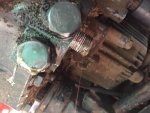
You can do this, much harder to explain than do. Unfortunately, this process can only remove offending material. It can't replace what is already missing.
 

RWey56

Member

Equipment
BX23S
Feb 8, 2018
111
3
18
Stanchfield, MN
Just out of curiosity, considering the nipple looks like it's not a replaceable part, how would one (or a shop) fix something like this if the threads are beyond rescuing? Cut it off flush then weld on a new nipple I'm guessing?
 

RWey56

Member

Equipment
BX23S
Feb 8, 2018
111
3
18
Stanchfield, MN
Ok, I have never use a die before but I will give it a shot. Is this something a weekend warrior with construction and automotive experience able to do or am I getting over my head. Also, besides bringing in the filter and testing, how would i know what size die to use?
Thanks
Ramos explained using the die really well in his last reply. If you've never used a die, you can get a bolt of the same thread size, put it in your vice, and try the die on that first to get a feel for it ... because you DON'T want to cross thread cut with a die.